
If like me you like building things, check out the following two blogs full of homemade training equipment guides:
DIY Strength Training Gear
Homemade Strength
Also check out some of the homemade equipment on our website and forum.
Happy building!
In training, Schwinners
Tuesday, 5 June 2012

Sunday, 8 January 2012
Homemade Weight Bench
I've recently started a strength program that requires bench press (Stronglifts 5x5), but I did not have a bench. I've accumulated a lot of off cuts from my various DIY projects and it was time to put them to use.
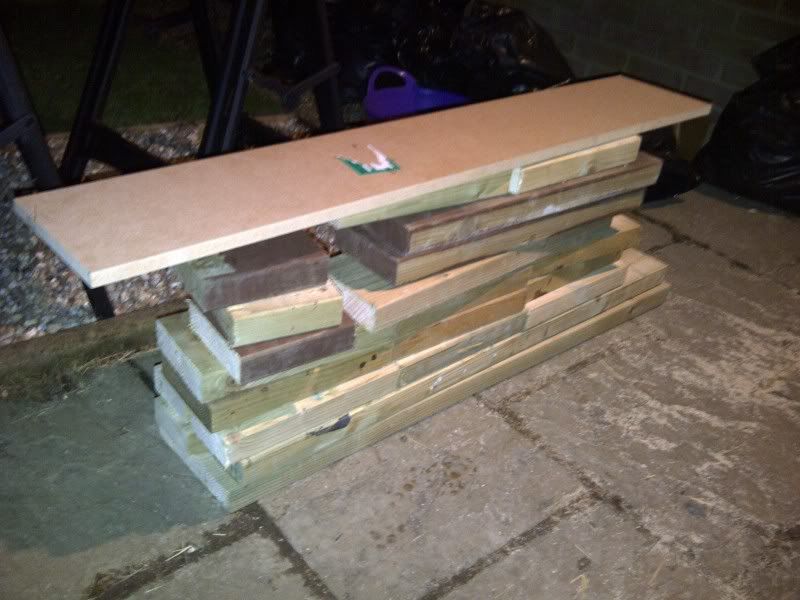
Obviously the bench needs to support both the weight of the user and the weight of the bar being lifted, so it needs to be strong.
I scoured the internet for plans and found a great set on Homemade Strength. This bench looked the business. The uprights were 15" 2x4. I had a load of 12" 2x6 left from my decking and wanted to use that (they were not great for much else!) so I needed to think about raising the bench a little so it would not be too low.
I scoured the internet some more and found these plans at Home-Gym-Bodybuilding.com where the uprights were mounted on 2x4, thus raising it another 2 inches.
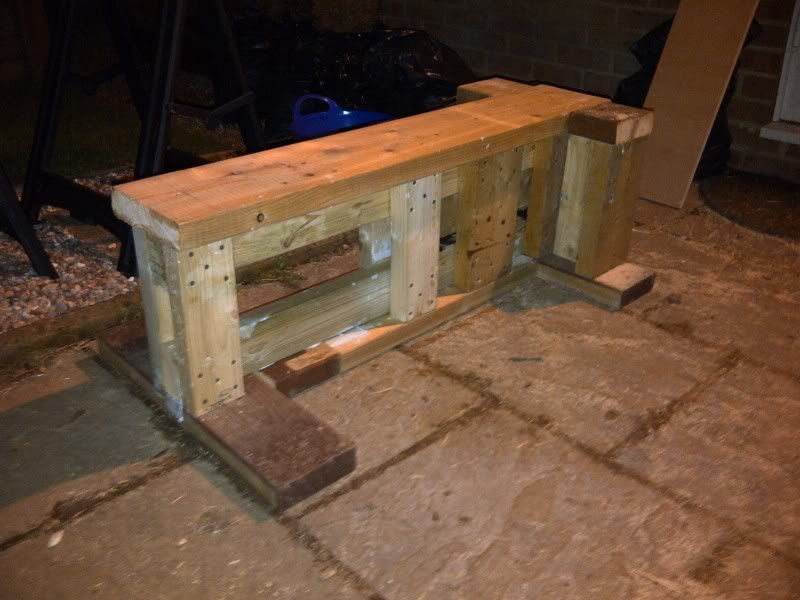
Putting those two ideas together I came up with the following frame. All pieces glued and screwed (with exterior wood glue and 3" deck screws) and the frame was a collection of 2x4, 2x6 and 2x8:
The only things I paid for specifically on this project was the materials for the cushion. Some 2" foam, leatherette cover, a piece of 18mm MDF offcut to mount the foam on, some bolts and wing nuts to make the cushion detachable. This came up to about £15.
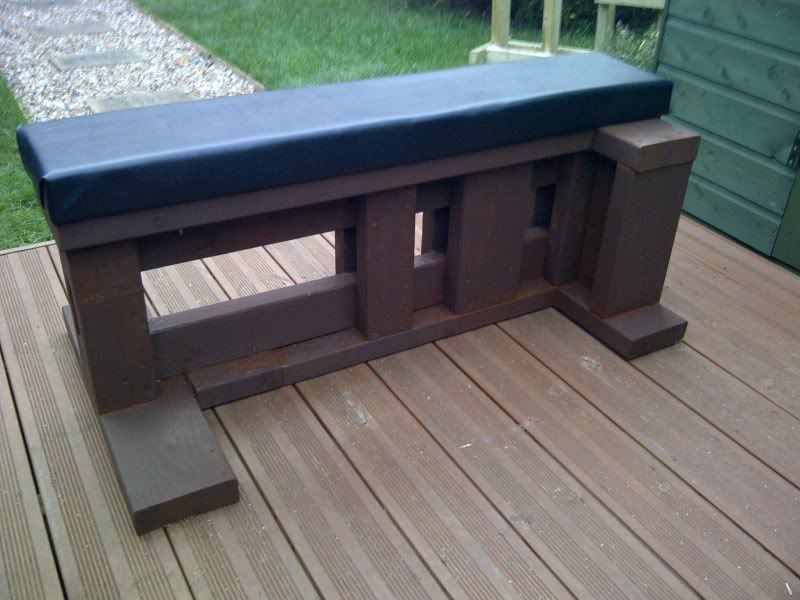
3 coats of woodstain and I had a complete bench:
I will not be posting a full guide to measurements etc, as I have not tested the full weight capabilities of it yet. This was more to show what is possible with a stack of wood most would call scrap!
Happy lifting!
Obviously the bench needs to support both the weight of the user and the weight of the bar being lifted, so it needs to be strong.
I scoured the internet for plans and found a great set on Homemade Strength. This bench looked the business. The uprights were 15" 2x4. I had a load of 12" 2x6 left from my decking and wanted to use that (they were not great for much else!) so I needed to think about raising the bench a little so it would not be too low.
I scoured the internet some more and found these plans at Home-Gym-Bodybuilding.com where the uprights were mounted on 2x4, thus raising it another 2 inches.
Putting those two ideas together I came up with the following frame. All pieces glued and screwed (with exterior wood glue and 3" deck screws) and the frame was a collection of 2x4, 2x6 and 2x8:
The only things I paid for specifically on this project was the materials for the cushion. Some 2" foam, leatherette cover, a piece of 18mm MDF offcut to mount the foam on, some bolts and wing nuts to make the cushion detachable. This came up to about £15.
3 coats of woodstain and I had a complete bench:
I will not be posting a full guide to measurements etc, as I have not tested the full weight capabilities of it yet. This was more to show what is possible with a stack of wood most would call scrap!
Happy lifting!
Tuesday, 22 November 2011
DIY Homemade Deadlift Blocks
Deadlift blocks are used to raise a deadlift from the ground a set height. Raising the start of the deadlift allows more weight to be shifted as it shortens the lift (known as partial deadlifts).
With all the DIY builds I've done I've amassed a lot of off-cuts and scrap wood which turned out to be just what I needed to make these blocks. However, if you were to buy the materials yourself, it would be cheaper than buying one ready made. Plus it's fun to build stuff!
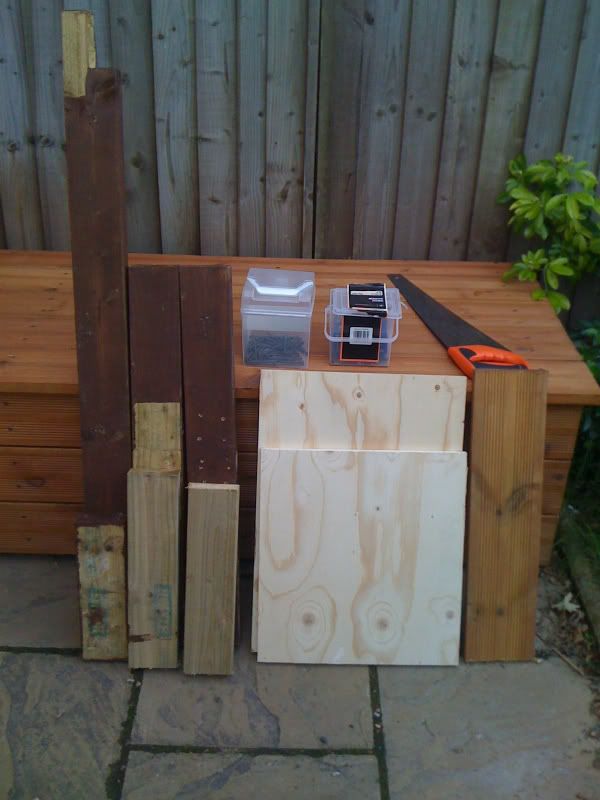
My materials were:
2x4" wood
18mm plywood
Approx 1x1" wood (in the picture I had an offcut of deck board which I planned to cut but found some other offcuts which I used instead)
Decking screws (I used some 65mm/75mm ones)
Hand saw
Drill (not pictured)
Tape measure (not pictured)
First thing to do is cut down the 2x4" wood to make a square, plus an extra horizontal piece in the middle. This extra piece is to support the plywood and reinforce it, to stop it from splitting under the weight of the bar and plates.
The square measures approx. 36cm x 33cm.
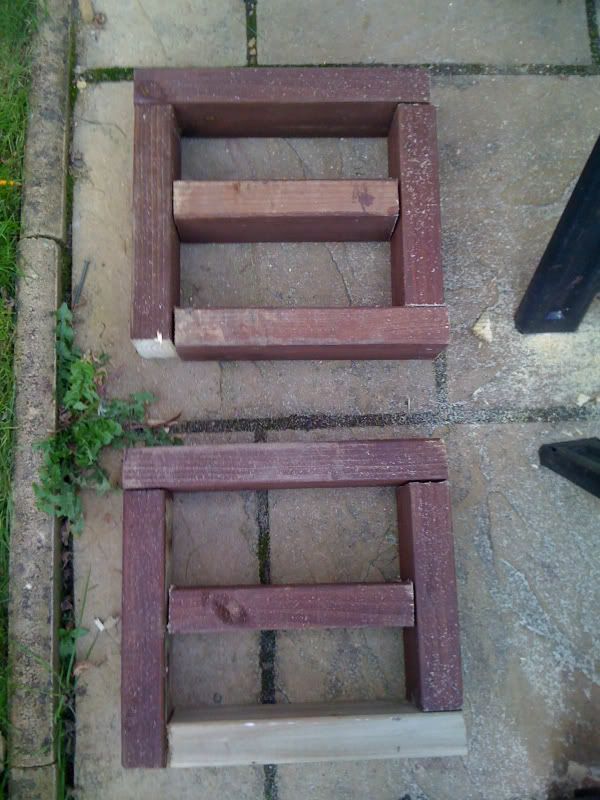
Using 2 screws for every join, attach the 2x4" pieces together. It's not necessary to use glue in my opinion.
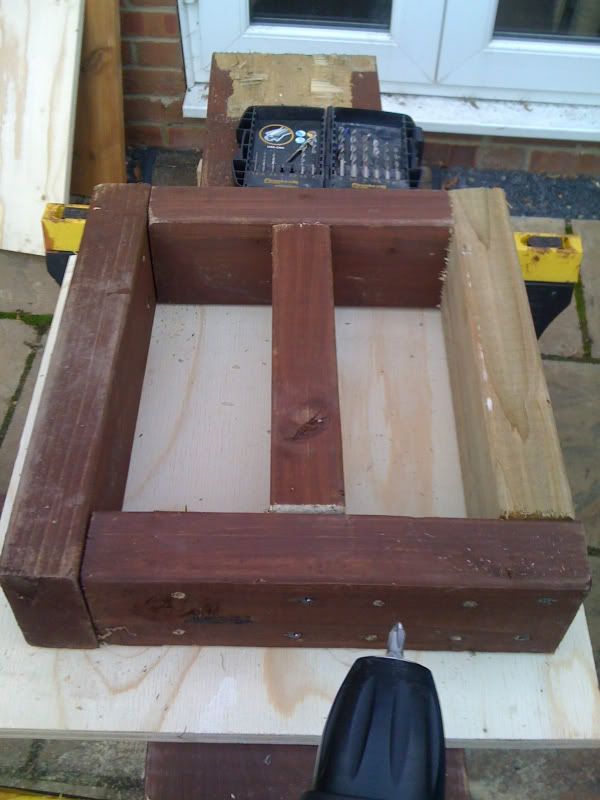
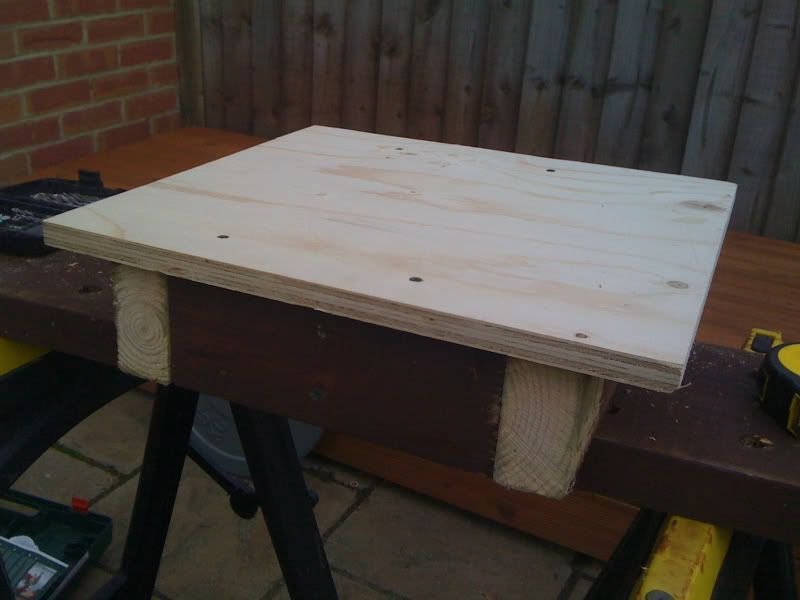
The plywood is approx. 40cm x 40cm. Take the plywood and screw it on top of your 2x4" frame. You only need to use a couple of screws per side. I also had to cut the plywood as necessary as my offcuts were different size.
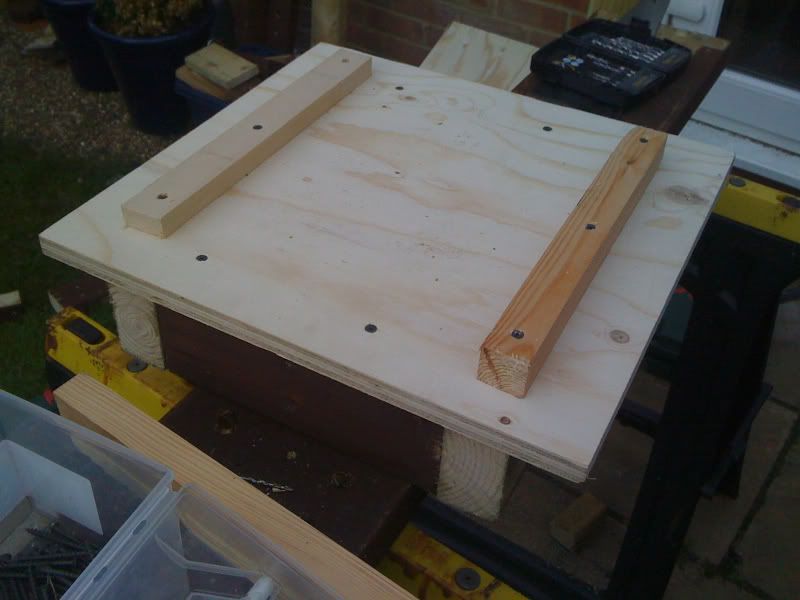
Next, take your small approx 1x1" wood and screw 2 rails to the top of the plywood. These are to act as a stopper to make sure your bar does not roll off the blocks if you are lifting on an uneven surface.
And that's it!
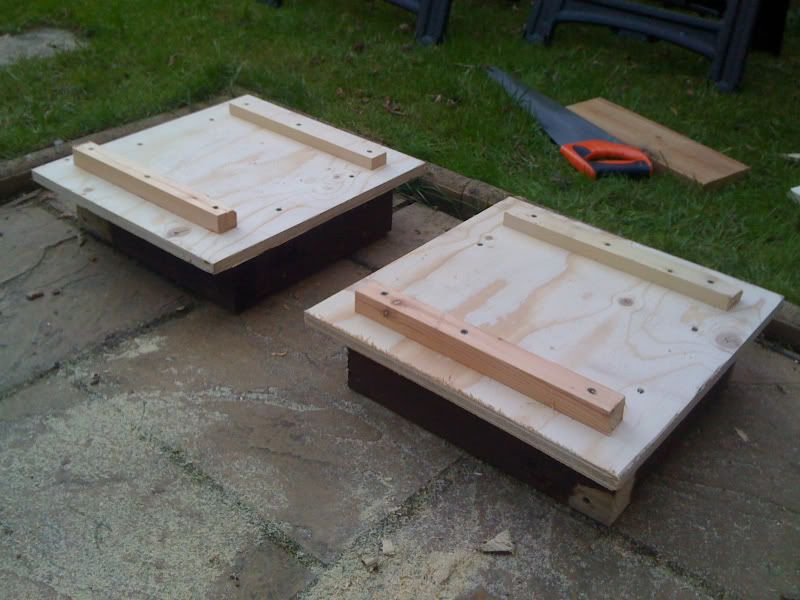
The following picture shows 160kg on the blocks, and they held up fine. I even stepped on each one whilst the 160kg was on the blocks, so adding 75kg each side. They held up fine even with this extra, so theoretically they could take 300kg+. I do not have that weight in plates though so I can't test this myself!
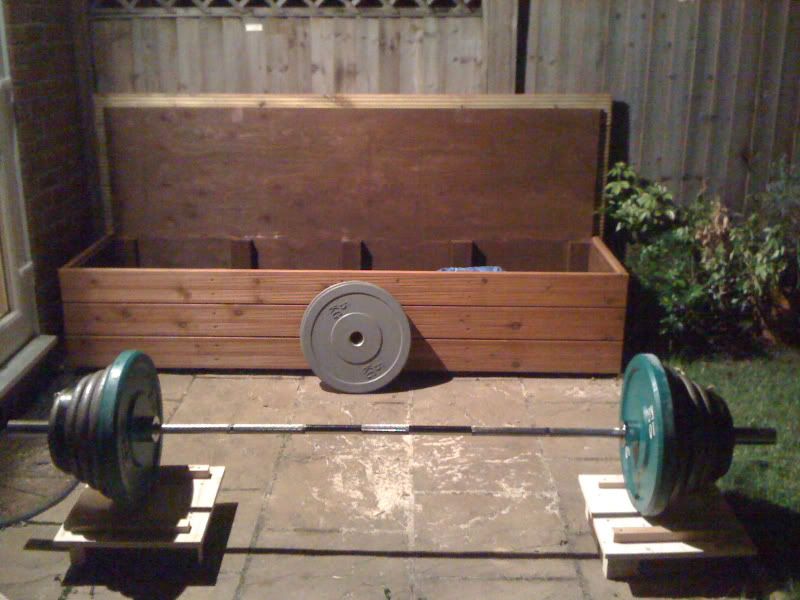
These blocks are approx. 11cm tall. It is very easy to make them higher by going from 2x4" to 2x6" or even 2x8".
Happy building!
With all the DIY builds I've done I've amassed a lot of off-cuts and scrap wood which turned out to be just what I needed to make these blocks. However, if you were to buy the materials yourself, it would be cheaper than buying one ready made. Plus it's fun to build stuff!
My materials were:
2x4" wood
18mm plywood
Approx 1x1" wood (in the picture I had an offcut of deck board which I planned to cut but found some other offcuts which I used instead)
Decking screws (I used some 65mm/75mm ones)
Hand saw
Drill (not pictured)
Tape measure (not pictured)
First thing to do is cut down the 2x4" wood to make a square, plus an extra horizontal piece in the middle. This extra piece is to support the plywood and reinforce it, to stop it from splitting under the weight of the bar and plates.
The square measures approx. 36cm x 33cm.
Using 2 screws for every join, attach the 2x4" pieces together. It's not necessary to use glue in my opinion.
The plywood is approx. 40cm x 40cm. Take the plywood and screw it on top of your 2x4" frame. You only need to use a couple of screws per side. I also had to cut the plywood as necessary as my offcuts were different size.
Next, take your small approx 1x1" wood and screw 2 rails to the top of the plywood. These are to act as a stopper to make sure your bar does not roll off the blocks if you are lifting on an uneven surface.
And that's it!
The following picture shows 160kg on the blocks, and they held up fine. I even stepped on each one whilst the 160kg was on the blocks, so adding 75kg each side. They held up fine even with this extra, so theoretically they could take 300kg+. I do not have that weight in plates though so I can't test this myself!
These blocks are approx. 11cm tall. It is very easy to make them higher by going from 2x4" to 2x6" or even 2x8".
Happy building!
Monday, 8 November 2010
Homemade Adjustable Box Jump
As with all homemade equipment, this is merely a guide, and if you decide to follow it, it is done at your own risk.
A few months ago, I made a homemade plyo/box jump (video here). It has served me well, especially as all the wood was essentially scrap. However, it took up a lot of space in my shed, is not waterproof and is limited to three sizes (16", 20" and 24"). So I set about coming up with something new that would be waterproof (stored outside) and provide many height options.
Here is the finished article!
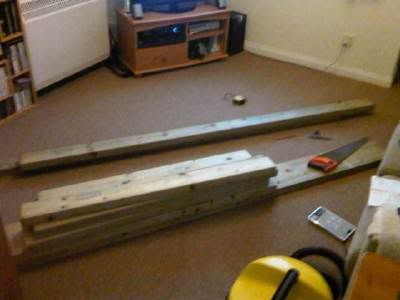
First thing to get was some treated exterior grade wood - some 2x4, 2x6 and 2x8, as I wanted it to be built like a tank!
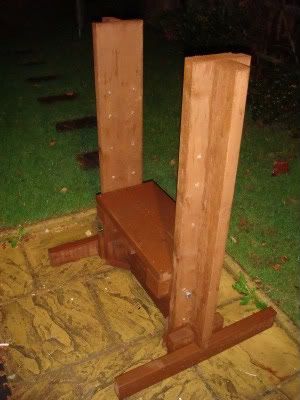
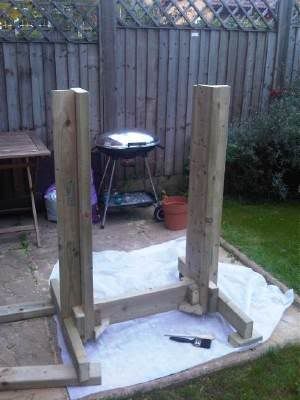
A frame was then constructed. The uprights are 50" tall 2x8, with 2x4 attached at 90 degrees to minimise flex. The bottom bit connecting the two uprights is a piece of 2x6 measuring 24". Where the uprights connect to the bottom, there is a mish mash of small pieces of wood which I kind of made up as I was going along but it seems to work! There are then two bits of 2x4 that act as lateral supports to minimise rocking. All attached using exterior wood glue and 3" decking screws. The frame looks like this:
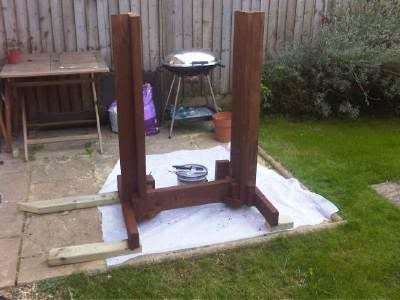
After two coats of fence/shed preservative it looks like this:
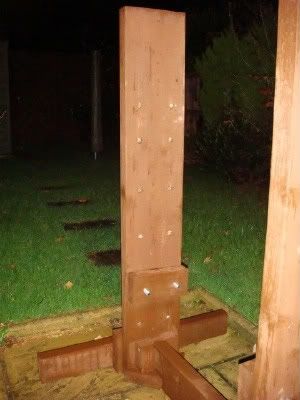
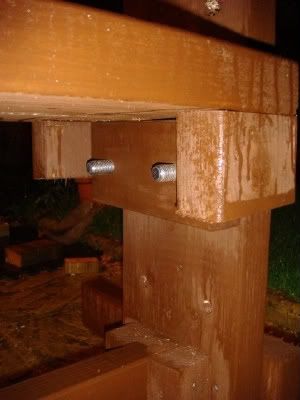
On each upright there are 16mm holes drilled on both sides, to allow two M16 bolts to be passed through and attach to a 8" piece of 2x4. This acts as the support to hold the platform in place. The fit is so tight at the moment that it doesn't require a nut to hold in place, but I have purchased some in case:
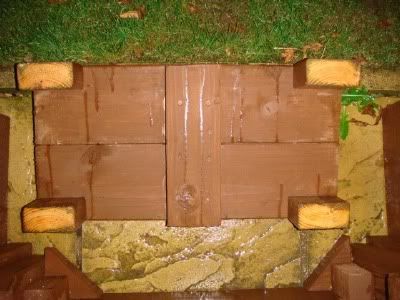
The platform is constructed using two 24" pieces of 2x6, attached/held together by a 12" piece of 2x4. In the corners are small offcuts of 2x4, spaced 8" apart:
This allows the platform to literally just sit like so:
In place the platform looks like this - which makes up the jumping surface:
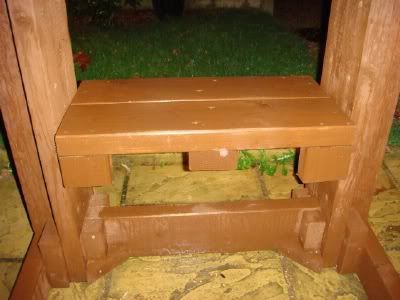
So there it is. This cost me approximately £50 to construct, most of which was for the wood, some money for the bolts/nuts and some money for the preservative. I already had the wood glue and screws from earlier projects. It currently lives outside on my patio (raised up on four small bits of 2x4 to stop it from getting damp underneath) and is holding up well.
To date I have drilled up 6 heights - 12", 18", 24", 30", 36" and 40". Theoretically it can go upto 50" (yet to be tested) and I can add new heights in between as needed by simply drilling two holes on each upright.
Below is a video showing it in action:
A few months ago, I made a homemade plyo/box jump (video here). It has served me well, especially as all the wood was essentially scrap. However, it took up a lot of space in my shed, is not waterproof and is limited to three sizes (16", 20" and 24"). So I set about coming up with something new that would be waterproof (stored outside) and provide many height options.
Here is the finished article!
First thing to get was some treated exterior grade wood - some 2x4, 2x6 and 2x8, as I wanted it to be built like a tank!
A frame was then constructed. The uprights are 50" tall 2x8, with 2x4 attached at 90 degrees to minimise flex. The bottom bit connecting the two uprights is a piece of 2x6 measuring 24". Where the uprights connect to the bottom, there is a mish mash of small pieces of wood which I kind of made up as I was going along but it seems to work! There are then two bits of 2x4 that act as lateral supports to minimise rocking. All attached using exterior wood glue and 3" decking screws. The frame looks like this:
After two coats of fence/shed preservative it looks like this:
On each upright there are 16mm holes drilled on both sides, to allow two M16 bolts to be passed through and attach to a 8" piece of 2x4. This acts as the support to hold the platform in place. The fit is so tight at the moment that it doesn't require a nut to hold in place, but I have purchased some in case:
The platform is constructed using two 24" pieces of 2x6, attached/held together by a 12" piece of 2x4. In the corners are small offcuts of 2x4, spaced 8" apart:
This allows the platform to literally just sit like so:
In place the platform looks like this - which makes up the jumping surface:
So there it is. This cost me approximately £50 to construct, most of which was for the wood, some money for the bolts/nuts and some money for the preservative. I already had the wood glue and screws from earlier projects. It currently lives outside on my patio (raised up on four small bits of 2x4 to stop it from getting damp underneath) and is holding up well.
To date I have drilled up 6 heights - 12", 18", 24", 30", 36" and 40". Theoretically it can go upto 50" (yet to be tested) and I can add new heights in between as needed by simply drilling two holes on each upright.
Below is a video showing it in action:
Saturday, 30 October 2010
Homemade Ab Wheels
As with all homemade equipment, this is merely a guide, and if you decide to follow it to make your own ab wheels, it is done at your own risk.
A normal, shop bought ab wheel has two wheels together in the middle, with a position on either side to hold with your hands. Such construction means you have to do wheel roll outs with two hands at once.
Ross Enamait of Rosstraining.com has brought the idea of an ab wheel that can be operated by one hand only to the masses. He makes a homemade version here and here.
I live in England and lawnmower wheels are not easy to come by. So here is what I did - all it invloves is to take a wheel you buy in a shop, two hose clamps (available from any DIY store), and a knife/pair of scissors.
Here is the finished product:
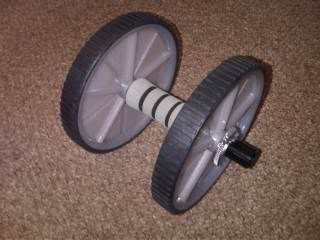
All you need to is take one of the existing handgrips off, cut off the end so you can slide it along to the middle of the bar. Then you can place one wheel either side of it, then put one hose clip either side to stop the wheels falling off the end. And voila!
Whilst a one handed wheel roll out might be hard to do, this kind of design is useful to allow you to roll out with one in each hand. Whilst a normal roll out follows a path straight forward, having two allows you to make different paths, like "T" (similar to a "fly" like you might do with rings/dumbells), and so on.
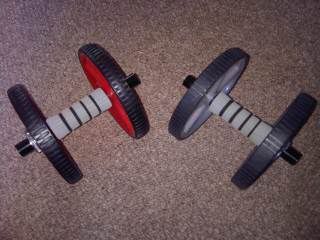
Happy rolling!
A normal, shop bought ab wheel has two wheels together in the middle, with a position on either side to hold with your hands. Such construction means you have to do wheel roll outs with two hands at once.
Ross Enamait of Rosstraining.com has brought the idea of an ab wheel that can be operated by one hand only to the masses. He makes a homemade version here and here.
I live in England and lawnmower wheels are not easy to come by. So here is what I did - all it invloves is to take a wheel you buy in a shop, two hose clamps (available from any DIY store), and a knife/pair of scissors.
Here is the finished product:
All you need to is take one of the existing handgrips off, cut off the end so you can slide it along to the middle of the bar. Then you can place one wheel either side of it, then put one hose clip either side to stop the wheels falling off the end. And voila!
Whilst a one handed wheel roll out might be hard to do, this kind of design is useful to allow you to roll out with one in each hand. Whilst a normal roll out follows a path straight forward, having two allows you to make different paths, like "T" (similar to a "fly" like you might do with rings/dumbells), and so on.
Happy rolling!
Tuesday, 3 August 2010
Homemade Plyo/Jump Box - Video
Later than planned, here is a video of me using the jump box I created here
The box has 3 platform heights - 16", 20" and 24", which makes it great to help with progressions, especially one legged jumps.
I'd like to point out that because of the way the box is constructed, it is heavier one side than the other, so requires a weight plate to be placed inside the frame to stop it rocking.
The box has 3 platform heights - 16", 20" and 24", which makes it great to help with progressions, especially one legged jumps.
I'd like to point out that because of the way the box is constructed, it is heavier one side than the other, so requires a weight plate to be placed inside the frame to stop it rocking.
Tuesday, 27 July 2010
Homemade Parallettes
As with all homemade equipment, this is merely a guide, and if you decide to follow it to make your own parallettes, it is done at your own risk.
I attempted to make parallettes out of PVC piping, which seems to be a common choice for the homemade versions. In the UK, this is not so easy. Two main problems I ran into:
1) PVC pipe is not overly strong in the UK compared to say, the US. So strength is an issue.
2) The construct relies on using "tees" which need to be at 90 degrees. However in the UK, they come in either 88.5 or 92.5 degrees (when I was looking for tees for 40mm pipe). Thus the uprights of the parallettes will be at an angle (if only slight).
So I decided wood was the way forward. End product was this:
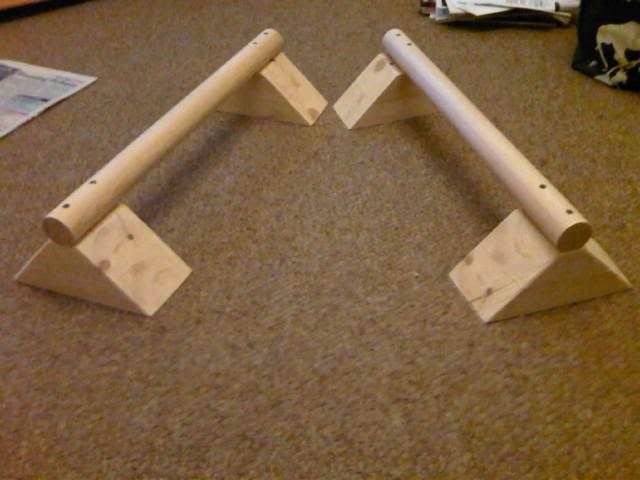
The feet were simply 2"x4" timber, one on top of the other (4" tall), glued and screwed. I cut 45 degree angles to make slanted sides to allow me to transition from l-sit to handstand without the feet getting in the way.
The rails are made of lengths of wooden hand rail I found at my local timber merchants. It is about 40mm in diameter. I cut this to 24" lengths, then glued/screwed them into the feet, like so:

The great thing about this rail was that it has approximately a 15mm flat part, allowing me to easily attach it to the feet and stop it from wanting to move. Not sure I explained that very well, so here is a picture:
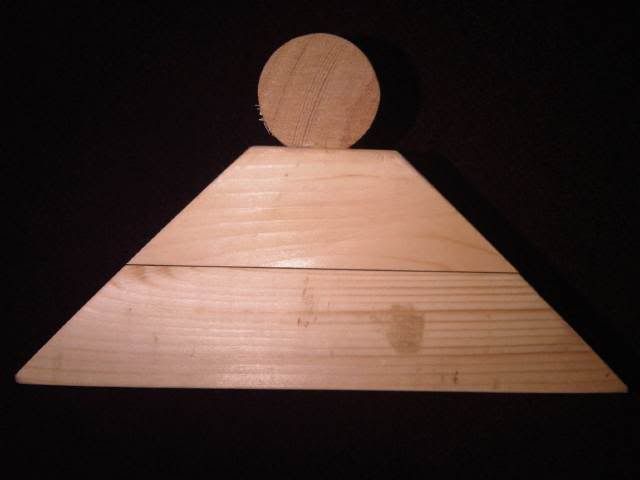
The whole lot cost me about £7.50. I have started with low parallettes, but these would be very easy to raise by gluing the feet to more lengths of 2"x4".
Despite my initial concerns about the strength of wood, these are very strong. I would like to add though that you should check the strength of your parallettes firstly by training a low move like an l-sit before trying something like a handstand, as I can only vouch for the strength of the wood I purchased.
I attempted to make parallettes out of PVC piping, which seems to be a common choice for the homemade versions. In the UK, this is not so easy. Two main problems I ran into:
1) PVC pipe is not overly strong in the UK compared to say, the US. So strength is an issue.
2) The construct relies on using "tees" which need to be at 90 degrees. However in the UK, they come in either 88.5 or 92.5 degrees (when I was looking for tees for 40mm pipe). Thus the uprights of the parallettes will be at an angle (if only slight).
So I decided wood was the way forward. End product was this:
The feet were simply 2"x4" timber, one on top of the other (4" tall), glued and screwed. I cut 45 degree angles to make slanted sides to allow me to transition from l-sit to handstand without the feet getting in the way.
The rails are made of lengths of wooden hand rail I found at my local timber merchants. It is about 40mm in diameter. I cut this to 24" lengths, then glued/screwed them into the feet, like so:
The great thing about this rail was that it has approximately a 15mm flat part, allowing me to easily attach it to the feet and stop it from wanting to move. Not sure I explained that very well, so here is a picture:
The whole lot cost me about £7.50. I have started with low parallettes, but these would be very easy to raise by gluing the feet to more lengths of 2"x4".
Despite my initial concerns about the strength of wood, these are very strong. I would like to add though that you should check the strength of your parallettes firstly by training a low move like an l-sit before trying something like a handstand, as I can only vouch for the strength of the wood I purchased.
Monday, 31 May 2010
Homemade Plyo/Jump Box
As with all homemade equipment, this is merely a guide, and if you decide to follow it to make your own plyo/jump box, it is done at your own risk.
We recently purchased a new wardrobe which meant I had to dismantle the old one. It was a built in wardrobe but very dated. However this meant it was built on a frame of 2x2 timber, with some 1/2" chipboard for some shelves. As I couldn't be asked to take the timber to the tip and I had wanted to make a plyo box for a while, I set about having a crack!
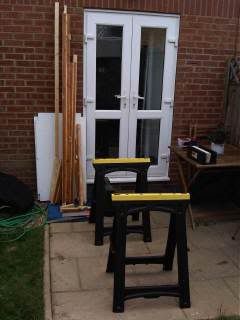
Here is the timber and my sawhorses (aka my squat spotters!)
I had seen this video where Mountain Athlete made a combination box that was 24" x 20", so it could be flipped over to allow it to be used as either a 20" or 24" box.
I fancied going one stage further, and having one that was 16", 20" and 24". After some drawings I set about making it. My woodworking skills are still a bit poor as I'm very lazy when it comes to cutting and measuring, but hey it seems to have worked!
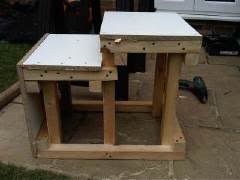
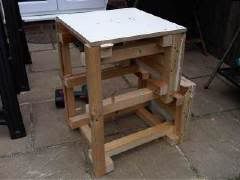
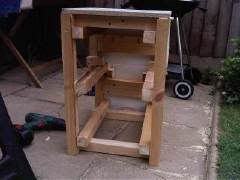
Frame made all glued and screwed, with additional beams under the landing surfaces for extra stability. Then covered it in carpet (also from the old wardrobe), so I ended up with:
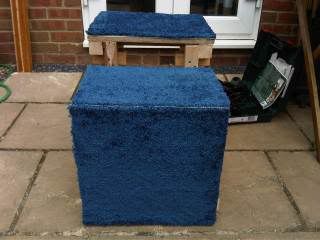
16" box
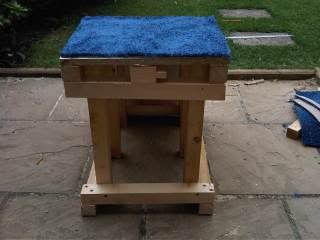
20" box
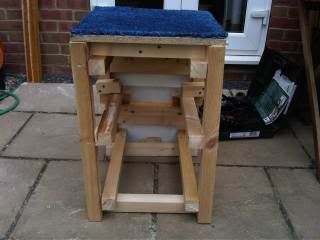
24" box
All in one! And it cost me time (about 5-6 hours total, because like always you run into problems!) and just screws and glue which I already owned! If you had to buy and make it yourself, I'd say you could do it for £20-£30 maybe, at a very rough guess!
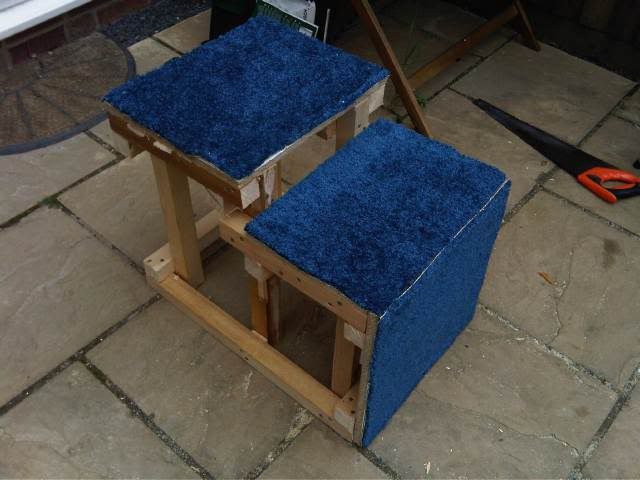
Will make a video over the next few days - can't jump on it now as I did some stuff to it earlier and the wood glue needs to dry. However I did jump on it yesterday and it seems pretty sturdy! Even if not it cost me nowt and next time I would use 2x4 timber instead.
We recently purchased a new wardrobe which meant I had to dismantle the old one. It was a built in wardrobe but very dated. However this meant it was built on a frame of 2x2 timber, with some 1/2" chipboard for some shelves. As I couldn't be asked to take the timber to the tip and I had wanted to make a plyo box for a while, I set about having a crack!
Here is the timber and my sawhorses (aka my squat spotters!)
I had seen this video where Mountain Athlete made a combination box that was 24" x 20", so it could be flipped over to allow it to be used as either a 20" or 24" box.
I fancied going one stage further, and having one that was 16", 20" and 24". After some drawings I set about making it. My woodworking skills are still a bit poor as I'm very lazy when it comes to cutting and measuring, but hey it seems to have worked!
Frame made all glued and screwed, with additional beams under the landing surfaces for extra stability. Then covered it in carpet (also from the old wardrobe), so I ended up with:
16" box
20" box
24" box
All in one! And it cost me time (about 5-6 hours total, because like always you run into problems!) and just screws and glue which I already owned! If you had to buy and make it yourself, I'd say you could do it for £20-£30 maybe, at a very rough guess!
Will make a video over the next few days - can't jump on it now as I did some stuff to it earlier and the wood glue needs to dry. However I did jump on it yesterday and it seems pretty sturdy! Even if not it cost me nowt and next time I would use 2x4 timber instead.
Friday, 6 February 2009
Equipment: My "new" dip belt
As with all homemade equipment, this is merely a guide, and if you decide to follow it to make your own dip belt, it is done at your own risk.
When I say new, I actually made it a few weeks back. I caught a glimpse of it a few minutes ago, and realised I'd planned to blog about it weeks ago but never did!
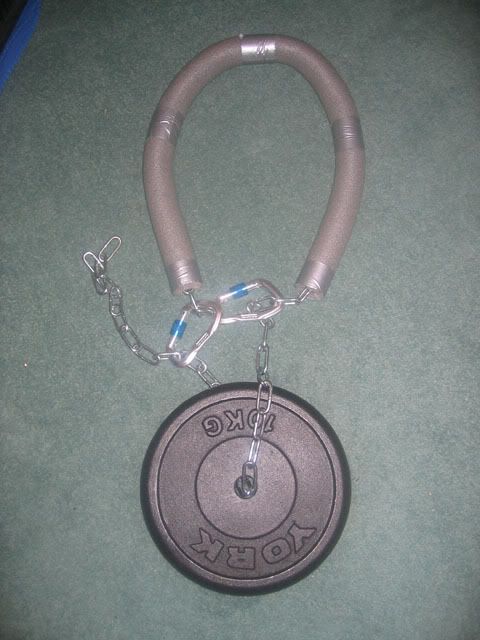
It was fairly simple to construct. The chain was a "Welded Steel Chain" from my local Wickes. 2m length, 5mm thick chain, 35mm individual chain length, maximum load 125kg. Cost me about £7. The padding is simple pipe insulation, costing about 60p, affixed with a few bits of gaffer tape. Finally, I got the chunkiest caribiners I could from my local climbing shop. They were £12 for the pair.
So for about £20, I have what has so far felt like a strong bit of kit.
If I did it again, I wouldn't have gone so OTT with the caribiners. They are a bit too chunky for the chain, which makes it a little awkward to change weights. But still it feels sturdy and that's the main thing!
When I say new, I actually made it a few weeks back. I caught a glimpse of it a few minutes ago, and realised I'd planned to blog about it weeks ago but never did!
It was fairly simple to construct. The chain was a "Welded Steel Chain" from my local Wickes. 2m length, 5mm thick chain, 35mm individual chain length, maximum load 125kg. Cost me about £7. The padding is simple pipe insulation, costing about 60p, affixed with a few bits of gaffer tape. Finally, I got the chunkiest caribiners I could from my local climbing shop. They were £12 for the pair.
So for about £20, I have what has so far felt like a strong bit of kit.
If I did it again, I wouldn't have gone so OTT with the caribiners. They are a bit too chunky for the chain, which makes it a little awkward to change weights. But still it feels sturdy and that's the main thing!
Subscribe to:
Posts (Atom)

 Posts
Posts


